

A Guide on How to Sell on Amazon as an Individual Seller
Author:
Neha Bhuchar
Last Updated:
Published on:

Did you know, according to the 2024 Small Business Empowerment Report by Amazon, more than 60% of sales activity in the Amazon marketplace comes from independent sellers?
Amazon is no longer just a platform for big brands and established businesses.
Over two decades ago, Amazon made a game-changing move by welcoming individual sellers, creating a powerful launchpad for anyone to start their own Amazon business from home. And, over the last 25 years, independent sellers have generated more than $2.5 trillion in sales in Amazon's store.
Whether you're looking to sell part-time, test a product idea, or start a side hustle, learning how to sell on Amazon as an individual seller is your ideal starting point. It is designed for those seeking a low-risk and affordable way to enter the world of e-commerce.
All you need to get started? A winning product!
In this guide, we’ll cover:
What is an Amazon Individual Seller Account?
Amazon Individual seller account vs Professional seller account
Why should you choose an Individual seller account?
How to create an Individual seller account on Amazon?
What are individual seller fees on Amazon?
How to list and sell products as an individual seller?
When should you consider upgrading to a Professional Account?
What is an Amazon Individual Seller Account?
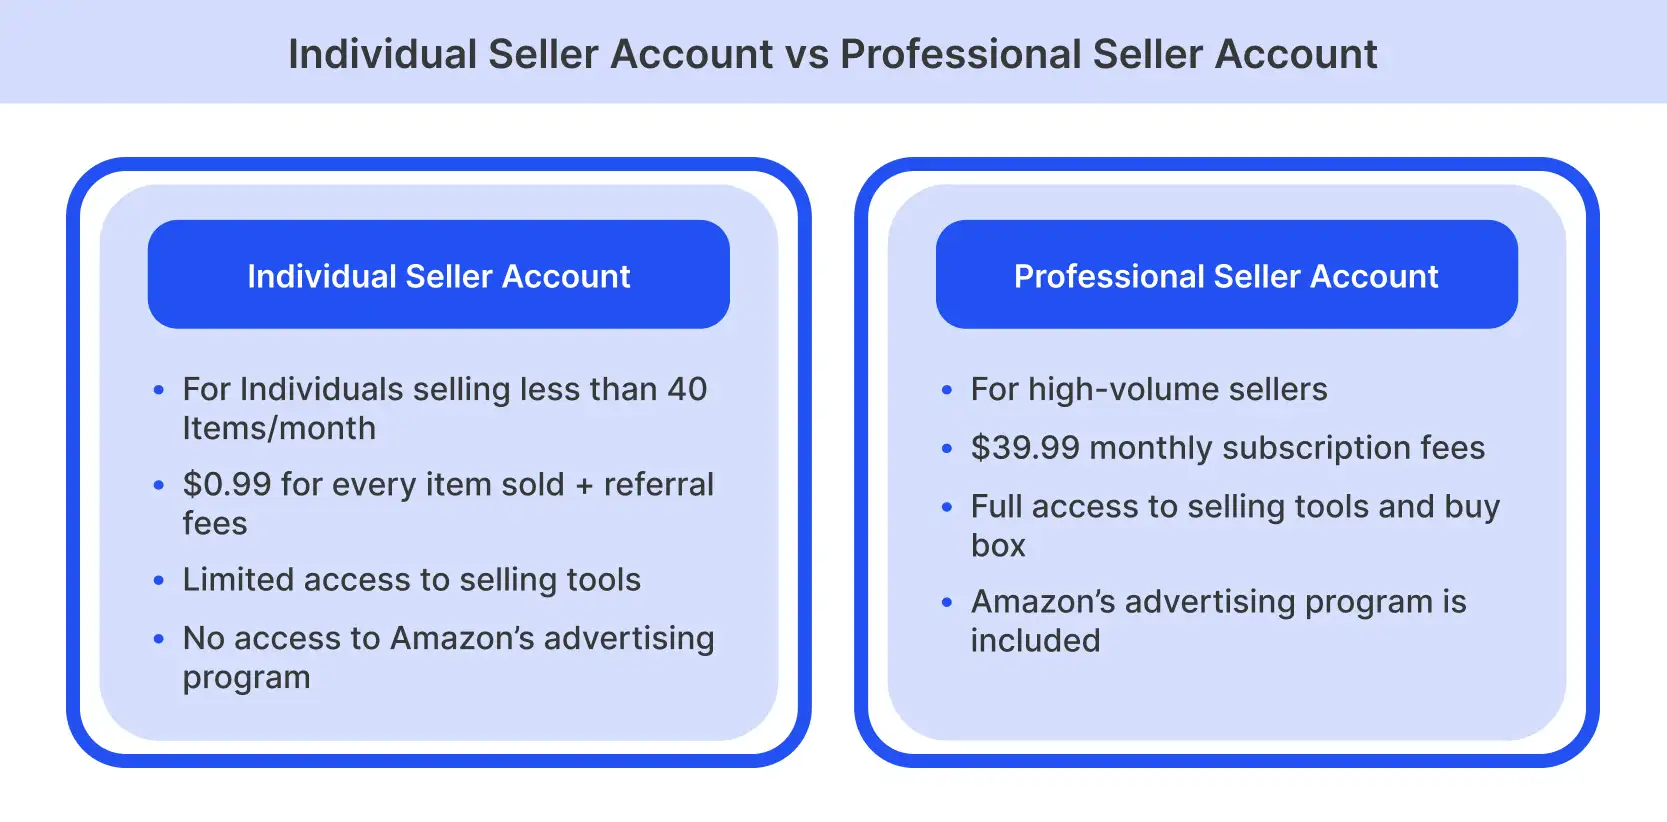
An Individual Seller Account is a type of Amazon account that is ideal for people looking to sell a limited number of items per month. With this account, you can list your products on the platform and pay a fee for every item sold, rather than a monthly subscription fee associated with a professional account.
For anyone wondering how to start selling on Amazon as an individual, this account type provides the perfect entry point with minimal risk.
Amazon provides access to a set of tools that are best suited for casual sellers, sellers looking to test the market before committing to the professional account, or those who are selling fewer than 40 items per month.
What is the difference between an individual and a professional seller account?
Amazon offers two distinct seller account types (individual and professional), each designed for different business stages and goals. The main difference between Amazon’s Individual and Professional selling plans is that Individual charges per item sold with fewer tools and limits, while Professional charges a monthly subscription in exchange for bulk listing, more reporting, advertising, and better access to features like the Buy Box and some programs. Your choice will impact not just your costs, but also which tools and growth opportunities you'll have access to.
Here's a detailed breakdown of their differences to help you make the right choice for your business.
Subscription fees and pricing
Amazon individual seller accounts operate on a per-item sale fee. This means that you have to pay $0.99 for every item sold, as opposed to monthly subscription fees.
On the other hand, in a professional seller account, you have to pay a fixed monthly fee of $39.99, regardless of sales volume.
Access to selling tools and features
Professional seller account holders have access to a wide range of advanced selling tools that help large-volume sellers. These include bulk listing uploads, running Amazon ad campaigns, detailed inventory statistics, eligibility to win the Buy Box, and much more.
In contrast, individual seller account holders are limited to manual listings and lack of access to performance-boosting tools.
Sales volume and suitability
Individual seller accounts are perfect for individuals who sell fewer than 40 items per month, such as part-time sellers, hobbyists, or those exploring their options. The low sales volume combined with the per-item fee ensures that the costs remain on the lower side.
On the other hand, professional seller accounts are more cost-effective for sellers with large sales volumes. With the flat monthly rate and the additional features, the plans are designed for people who consider Amazon a full-time business or anticipate rapid growth.
Still unsure which account type fits your goals? Use this decision framework:
Start with Individual if you answer "yes" to most:
|
Choose Professional if you answer "yes" to most:
|
Remember, you can always start with an Individual account and upgrade when your business grows.
Why should you choose an Amazon Individual Seller account?
You should choose an Amazon Individual Seller account if you’re just starting out, sell only occasionally, or want to test the market with minimal risk and upfront cost. It’s simple to set up, doesn’t require a monthly subscription fee, and you only pay a fee when you make a sale, which makes it budget-friendly for low-volume or experimental selling. Just keep in mind that you’ll miss out on advanced tools (like advertising, better analytics, and bulk listing), may pay higher fees per item overall, and will need to create each listing manually.
Pros of an Individual seller account
Simple to get started – Setting up an individual seller account is relatively easy and requires minimal information.
No subscription amount – Unlike professional seller accounts, individual accounts have no monthly subscription fees, which makes it cost-effective for occasional sellers.
Low risk for beginners – Since you have to pay only a fee for every item sold, it makes it an attractive and low-risk option for sellers starting or testing the market.
Cons of an Individual seller account
Limited features – Individual seller accounts have limited access to advanced features, such as Amazon advertising and promotional tools, buy box visibility, inventory management, advanced sales analytics, and more.
Higher fees per item – While there are no monthly subscription fees, the fee for each item sold can quickly add up.
No bulk listing – Individual seller account holders are required to enter each listing manually, as opposed to professional sellers who can use the bulk listing feature.
Ready to take the plunge? The next step in your journey to becoming an Amazon individual seller is creating your account. Follow our detailed walkthrough to set up your selling foundation correctly from day one.
How to create an Individual seller account on Amazon?
Step 1: Gather your personal information
To make the process smoother, gather the following to create your Amazon seller account:
Legal name, business name, and address
Government-issued ID
An email address and a working phone number
“Ship from” address, if you are shipping products from a different address than your business address
Bank account details
Tax information, such as a tax ID or a Social Security number
Step 2: Go to the Amazon seller registration page
Learning how to start selling on Amazon as an individual begins with accessing the official registration process. Go to the Amazon Seller Central website, which is the hub for all seller activities. Navigate to the “Sign up” button that is prominently displayed.
Step 3: Enter email and password
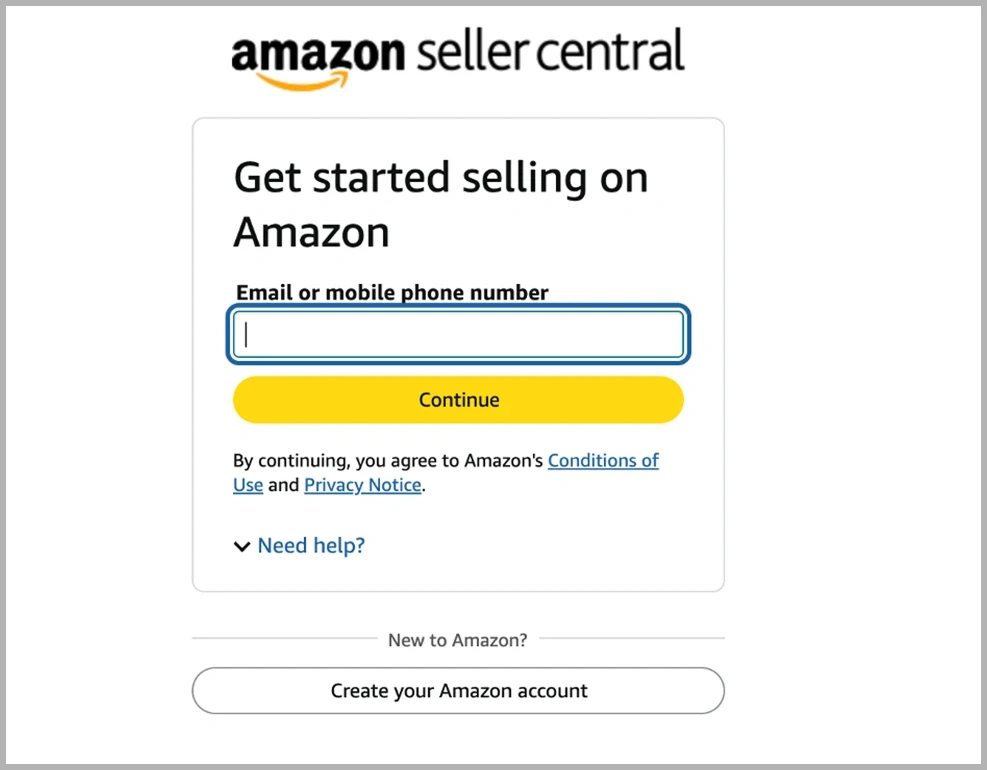
On the registration page, you will need to sign up for an account. You can either create a new Amazon account or use an existing account for registration. Amazon recommends using an email address that is different from your customer account.
Ensure that the email you choose is active, as a verification code is sent to the email address for confirmation.
Step 4: Choose your business location and type
Select the country where your business is registered or where you live. You’ll then be required to choose your type of business from the drop-down menu. If you don’t have a registered company, select “None, I am an individual.”
Step 5: Enter and verify your personal details
Fill in your personal information, including your birthday and address. You also need to enter your passport or driver’s license number. Lastly, enter your phone number and choose to receive your verification code via phone call or SMS. Fill in the code you receive and click “Next”.
Use your legal name, not a business name or nickname. Mismatches between your ID and registered information cause verification delays.
Step 6: Add your payment details
You will need to enter your valid bank account details in the next step. Amazon directly deposits your sales proceeds into the bank account that you specify. Double-check account and routing numbers. Incorrect banking information can delay your first payment by weeks.
Step 7: Choose a name for your store
In the next step, you will need to enter your Amazon store name. This is the name that your customers will see. However, if you are unsure, you can always change this name later. You will also need to provide information on Amazon product codes, business certifications, and manufacturer or brand status.
Step 8: Verify your identity
Amazon will require you to upload a clear picture of your passport or driver’s license and proof of residential business address, which can be your bank account or credit card statement.
You will also be prompted to take a picture of yourself and your government ID or schedule a video call with an Amazon associate for verification.
Ensure good lighting, avoid glare on documents, and have a stable internet connection for video verification.
Step 9: Submit for verification
Once you have completed the entire process, submit the registration form to Amazon for verification. It can take anywhere from 1 to 3 business days to verify your identity and account.
After you have been verified, you can start listing your products and selling on Amazon as an individual seller. But before that, it is crucial to understand the pricing and fees.
What are individual seller fees on Amazon? / How much does it cost to be an individual seller on Amazon?
As an individual seller on Amazon, you’re charged per sale: a $0.99 fee for each item sold, plus a referral fee that’s a percentage of the total sale price (item price + shipping/gift wrap), typically ranging from about 5% to 20% depending on the category, with a minimum of $0.30 per item. If you use Fulfillment by Amazon (FBA), you’ll also pay separate fulfillment fees based on your product’s size and weight, and if an order is refunded, Amazon charges a refund administration fee equal to the lower of $5 or 20% of the referral fee.
Here’s the detailed breakdown of an individual seller’s costs on Amazon:
Per Item Fee
As we have seen above, individual sellers pay a fee of $0.99 for each item sold. Since this fee is charged once the sale is made, you can factor it into your product sale price and profit calculations.
Referral Fees
Amazon charges a referral fee for every product sold. This fee is a percentage of the total price, which includes the price of your product as well as any shipping or gift wrap charges. This fee can vary depending on the category of your product. For instance, the referral fee for a beauty product may differ from the fee for electronics.
Amazon Referral Fees by Category
Category | Fee Structure | Individual Seller Example |
Electronics & Computers | 8% | $50 phone case = $4.00 fee |
Beauty & Personal Care | 8% (≤$10), 15% (>$10) | $8 lip balm = $0.64, $25 serum = $3.75 |
Baby Products | 8% (≤$10), 15% (>$10) | $9 toy = $0.72, $35 stroller = $5.25 |
Clothing & Accessories | 5% (≤$15), 10% ($15.01-$20), 17% (>$20) | $12 shirt = $0.60. $18 hat = $1.80, $45 jacket = $7.65 |
Books, DVDs, Music | 15% | $20 book = $3.00 fee |
Home & Kitchen | 15% | $30 kitchen tool = $4.50 fee |
Sports & Outdoors | 15% | $40 fitness equipment = $6.00 fee |
Toys & Games | 15% | $25 board game = $3.75 fee |
Footwear | 15% | $60 sneakers = $9.00 fee |
Jewelry | 20% (≤$250), 5% (>$250) | $100 necklace = $20.00, $300 watch = $52.50 |
Electronics Accessories | 15% (≤$100), 8% (>$100) | $80 headphones = $12.00, $150 speaker = $19.00 |
Furniture | 15% (≤$200), 10% (>$200) | $150 chair = $22.50, $350 desk = $45.00 |
Automotive | 12% | $25 car accessory = $3.00 fee |
Pet Supplies | 15% | $30 dog toy = $4.50 fee |
Note: All products have a minimum referral fee of $0.30
Fulfillment Fees
If you choose Fulfillment by Amazon (FBA), you will incur additional fulfillment fees. These fees cover the costs of warehousing, packing, and shipping your products, and they depend on the size and weight of your items.
While FBA simplifies the process of delivering products to your customers, it is important to consider the costs and how they will impact your profits.
Refund administration fees
You will also be required to pay a refund administration fee for return orders where payment was received. The fee is $5.00 or 20% of the referral fee, whichever is lower.
Now that you know exactly what Amazon charges, you can calculate your true profit margins before sourcing any products.
How to list and sell products as an individual seller?
Once your account is approved, you're ready for the exciting part, listing your first products. Mastering how to sell on Amazon as an individual seller means creating listings that not only comply with Amazon's requirements but also convert browsers into buyers. The key is starting strategically with products you understand well, then scaling based on what actually sells.
Find your product category
Choosing an appropriate category is vital, as it improves visibility in search results and ensures your listing complies with Amazon’s policies.
Search similar products on Amazon and note their category paths (visible in product details)
Use Seller Central's Category Finder: Inventory → Add a Product → Category suggestions
Check competitor listings in your niche to see where successful products are placed.
So, what items can an Amazon individual seller list? An Amazon individual seller can list most allowed products in open categories, but some product types and gated categories are restricted, which means you need approval before listing them. This helps ensure that the products sold are safe, authentic, and meet Amazon’s regulations.
Restricted Categories for Individual Sellers:
Automotive parts (safety approval required)
Beauty with ingestible products (FDA documentation needed)
Jewelry over $500 (brand approval required)
Watches (brand registry often required)
Create a new product listing or match an existing one
There are two ways to list products on Amazon: sell an existing one or upload an entirely new product.
To see a product under an existing ASIN, follow these steps:
Log in to Seller Central
Navigate to the catalog tab in the left-hand corner. Click on “Add products”.
Enter the name, GTIN, or UPC of the product. Alternatively, you can also input the title or description to find the product.
Select the correct product from the results. Double-check to confirm that this is the product you want to sell.
Click “Sell this product” next to the listing.
Fill in the necessary details like quantity and fulfillment method.
Click on “Save and finish.”
Alternatively, if you want to list an entirely new product, follow these steps:
Log in to Amazon Seller Central
Navigate to the “Inventory” tab and select “Add a product”. Choose “Blank form” to get started.
Add your “Item Name” and “Product Category”. Amazon automatically assigns a category according to your product name. You can change it by choosing the “Select Other” option. You will also need to input your brand name and select if the product has variations.
Add a keyword-rich and detailed product description. Also, upload clear photos of your product.
In the offer tab, fill in your SKU number, quantity, listing price, product condition, and fulfillment method. Click on “Save and Finish” once done.
Add any relevant safety and compliance info.
Hit “Save and Finish” to upload your listing.
Add product details
When you are building a new listing, you will need to add a few details to create compelling product pages.
Product Title – Your product title is the first thing that the customer notices in the product detail pages. Therefore, ensure that it includes your keywords, features, product size, and quantity.
Example:
Poor: "Water Bottle Blue"
Better: "BRAND Insulated Water Bottle - 32oz Stainless Steel - Keeps Cold 24 Hours"
Detailed Product Description – Include a detailed and keyword-rich description about your product that answers almost all of your customers’ questions. Do not forget adding backend keywords. Focus on the benefits to show how your product makes their life easier or better.
High-Quality Photos – The difference between online and offline shopping is that customers can’t touch, feel, or try out products. You can bridge this gap by uploading HD quality lifestyle photos that highlight all your item’s features.
Set your shipping and fulfillment preferences
When learning how to sell as an individual seller on Amazon, your fulfillment choice significantly impacts both costs and customer experience.
Fulfillment by Amazon (FBA)
In this method, you send your products to Amazon’s warehouses for storage. Once a sale is made, Amazon manages the entire fulfillment process, including packing, shipping, customer service, and returns. This option is the most preferred among sellers because of its convenience. However, it incurs storage fees based on the size and volume of your products, which can impact profitability.
Fulfillment by Merchant (FBM)
Alternatively, FBM requires you to manage your inventory, packing, and shipping. While this option avoids storage fees, you will be responsible for logistics and customer service. This option is ideal for sellers who are cautious about storage fees or those testing the market.
Which option should you choose?
The choice between the two depends on sales volume, financial considerations, and scalability goals. If you are confident in your sales and looking for scalability, FBA’s convenience outweighs the costs. But if you are uncertain about sales volume and want to avoid storage fees, FBM is your best bet.
When should you consider upgrading to a Professional Account?
Many successful Amazon individual seller accounts eventually graduate to professional status based on high demand.
If you are consistently selling more than 40 items per month, switch to a professional account. The flat monthly rate of a professional account can be more cost-effective if you are selling at a higher volume. To make a decision, take into account the monthly subscription fees of a professional account and compare them with the per-item fees of an individual account.
As we saw above, a professional account offers access to various selling tools, including bulk listing, reporting tools, inventory management, and Amazon’s advertising program. If your business requires these features, you might want to consider an upgrade.
When NOT to Upgrade
Selling fewer than 40 items monthly without growth plans
Satisfied with current sales levels and visibility
Selling in low-competition categories where ads aren't necessary
Still testing product viability or market demand
Operating seasonally with inconsistent sales patterns
The decision to upgrade will ultimately come down to your business goals and the costs versus benefits of making the switch.
How to switch from an Individual seller account to a Professional seller account?
To switch from an individual account to a professional account, follow these steps:
Log in to your Amazon Seller Central.
Select “Account Info” under the “Settings” tab.
Navigate to the “Account Overview” section and select “Sell on Amazon.”
Here you can find the option to change your account from individual to professional for different marketplaces.
Complete the upgrade process by providing additional business information and a payment method for monthly subscription fees.
Once your account has been upgraded, you will receive an email from Amazon. You can then start using the advanced tools and features available to professional sellers.
Ready to Launch Your Amazon Individual Seller Journey?
You now have everything needed to start selling successfully on Amazon as an individual seller. From account setup and fee calculations to product listing strategies, this guide has equipped you with the knowledge that typically takes months to learn through trial and error.
As your business evolves and sales increase, you'll eventually need more sophisticated tools to compete effectively. When that time comes, professional advertising and inventory management become crucial for continued growth.
atom11, an ads automation platform, combines ads with retail insights such as inventory, competition, and PPC cannibalization. This platform helps elevate your Amazon ads strategy by optimizing spending, increasing sales, and improving advertising performance.
Many successful sellers start as individuals, learn the fundamentals, then leverage automation platforms like atom11 to scale efficiently without getting overwhelmed by complex Amazon advertising management.
Ready to begin? Set up your account today and list your first product this week.
Ready to scale beyond individual selling? Book a demo with atom11 to see how automated advertising management can accelerate your growth when you're ready for professional tools.
FAQs on How to Sell on Amazon as an Individual Seller
Can I sell a single product on Amazon?
Yes, you can sell only one item on Amazon. You can start selling by logging into Amazon Seller Central and choosing an Individual or Professional account.
What is the MOQ on Amazon?
Minimum Order Quantity (MOQ) is the offer level attribute that informs customers of the minimum quantity that needs to be purchased. Customers are able to buy quantities equal to or higher than the MOQ limit.
Do I need a business license to sell on Amazon as an individual?
No, individual seller accounts don't require a business license. You can sell using your Social Security Number for tax purposes. However, check your local laws as some cities/states may require permits for certain product types.
How long does Amazon seller approval take?
Amazon typically approves individual seller accounts within 1-3 business days. However, identity verification can take longer if your documents aren't clear or if additional verification is needed.
Can I use my personal bank account for Amazon payments?
Yes, individual sellers can use personal checking accounts. Ensure the account is in your legal name matching your seller account registration to avoid payment delays.
What happens if I don't have UPC codes for my products?
For new product listings, you'll need UPC/EAN codes. You can purchase legitimate codes from GS1 or authorized resellers. Some categories allow GTIN exemptions for handmade or private label products.
How do I handle taxes as an Amazon individual seller?
Amazon provides tax documents (1099-K forms) for sellers with $20,000+ in sales. Track all business expenses, as individual sellers report income on Schedule C of their personal tax return. Consider consulting a tax professional.
Can I sell on Amazon without holding inventory?
Yes, through dropshipping, but you must identify yourself as the seller and ensure fast shipping. Amazon has strict dropshipping policies, so review them carefully before starting.
How do I get my first product reviews as a new seller?
Focus on excellent customer service, fast shipping, and follow-up emails (within Amazon's guidelines). Never offer incentives for positive reviews or deleting negative reviews. Consider starting with FBA for faster shipping and better customer experience.
What are the best beginner products for individual sellers?
Start with products you understand well, priced $20-50 (to absorb the $0.99 fee), lightweight for shipping, and in categories with 8-15% referral fees. Avoid restricted categories initially.
Can I sell on Amazon if I live outside the US?
Yes, but you'll need US tax information and a US bank account. Amazon Global Selling program supports international sellers, though individual accounts have more limitations than professional accounts for international sellers.
How do I make my products more visible on Amazon?
To make your products more visible on Amazon, you can optimize your product listings with high-intent keywords, use high-quality photos, utilize advertising tools, ensure proper ad placement, leverage customer reviews, and more.
Can I sell on Amazon as an individual without registering a business?
Yes, you can sell on Amazon as an individual without registering a formal business, as long as you provide the required personal, tax, and payment information for your country.
Does being an Amazon individual seller affect the Buy Box chances?
Yes, being an Amazon Individual seller can affect your Buy Box chances, since Professional accounts typically have better access and more tools to meet the performance metrics Amazon favors for the Buy Box.
How does Amazon pay individual sellers?
Amazon pays individual sellers by sending their sales proceeds, minus fees and refunds, to the bank account they’ve linked in Seller Central on a regular payout schedule (for example, every 1–2 weeks, depending on marketplace rules).
How many items can an Amazon individual seller list per month?
Amazon Individual sellers can list a limited number of items per month (often capped around a few dozen to a couple hundred listings), with the exact limit and any changes shown inside Seller Central.

